Sunday, 25 October 2015

How To Disable The Snap View Feature In Windows 8.1

Aero Snap, Aero Peek and Aero Shake are the three nice features introduced first with Windows 7 operating system. The Snap feature, which is present in Windows 8 and Windows 8.1 as well, allows you work on two programs side-by-side by showing two windows side-by-side on the same screen.
The beauty of Snap feature is that you can quickly snap windows with the help of keyboard shortcuts. All you need to do is use the Windows logo key and the left/right arrow key to snap the active window to the left or right side of the screen. Those who prefer using a mouse over keyboard can move a window to the left or right edge of the screen to automatically resize and snap it.
Disable Snap view in Windows 7 or Windows 8
Snap feature comes in handy for those who would like to simultaneously work with multiple applications on the same screen. However, if for some reason, you find the Snap feature not so useful and want to disable the same, you can do so by following the instructions in one of the two methods given below.
Method 1

Turn off the Snap feature using Control Panel

Step 1: Right-click on the desktop and then click Personalise option to open the Personalization window.
Disable Snap view in Windows 7 or Windows 8 picture1
Step 2: In the left-pane, click on the link labelled Ease of Access Center to open the same.
Disable Snap view in Windows 7 or Windows 8 picture2
Step 3: Once Ease of Access Center window is opened, under Explore all settings, click on the link labelledMake the keyboard easier to use.
Disable Snap view in Windows 7 or Windows 8 picture3
Step 4: Here, under Make it easier to manage windows section, check the option labelled Prevent windows from being automatically arranged when moved to the edge of the screen. Click Apply button. That’s it!
Disable Snap view in Windows 7 or Windows 8 picture4
Method 2

Disable Snap view using Windows Registry

Step 1: Open Registry Editor. To do so, simultaneously press Windows + R keys to see Run command box, type Regedit.exe, and then press Enter key. Click Yes button when you see the UAC prompt.
Disable Snap view in Windows 7 or Windows 8 picture5
Step 2: Next, navigate to the following key:
HKEY_CURRENT_USER \Control Panel\Desktop
Disable Snap view in Windows 7 or Windows 8 picture6
Step 3: On the right-side, look for the option labelled WindowArrangementActive and double-click on the same. Change its value from the default 1 to ”0” (zero) to disable the snap view feature. That’s it!
Disable Snap view in Windows 7 or Windows 8 picture7
To turn Snap feature on again, change the value from “0” to “1”.
And if you love the Snap feature, you can add more features to it by reading our Freesnap adds additional features to Snap feature guide.

Free Tools To Open DMG Files On Windows PC

None of the versions of Windows operating system supports DMG format out of the box. As you likely know, DMG file is an OS X disk image file and are supported in Mac OS X operating system. One needs to take the help of third-party tools in order to open a DMG file on a PC running Windows operating system.
Those of you have spent considerable amount of time on Mac OS X would know that it’s mostly used to install apps on Mac. In other words, apps that we download to install on a Mac OS X use .DMG extension and can be mounted easily by double-clicking on the file.
Open DMG Files In Windows os
While there are a couple of handy options out there to open or extract a DMG file in Windows, we will share the best three tools to deal with DMG files in Windows environment.

DMG Extractor

DMG Extractor is probably the first and only tool designed exclusively to deal with DMG files in Windows. Since DMG Extractor is developed specially for DMG files, it can open encrypted .DMG files without having to first convert them to other formats.
Raw, Bzip2, Zlib, and Zero block type DMG files are supported by DMG Extractor.
Open DMG Files In Windows
The only catch with the free version of DMG Extractor is that it can’t open DMG file of size more than 4GB but that shouldn’t be problem for most users.
Using DMG Extractor is fairly simple. After installing the software, right-click on the DMG file that you want to open and then click Open option to open the file with DMG Extractor. Alternatively, after launching DMG Extractor, click Open button and then select the DMG file to contents of the selected DMG file.
To extract a DMG file, click the Extract button and then select a location to save the contents.

HFSExplorer

Another free utility that you can install on your Windows machine to extract DMG files is HFS+ Explorer. With HFSExplorer you can open Mac-formatted disks and disk images in Windows.
While HFSExplorer is relatively easy-to-use, we must mention that it’s not as straight-forward as DMG Extractor. You need to install Java SE Runtime Environment 5.0 or above in order to run HFSExplorer and it doesn’t support all type of DMG format, including DMG UDF format.
Open DMG Files In Windows using hfsexplorer
However, on the plus side, there is no size restriction per file.
Here is how to use HFSExplorer to open DMG files
Step 1: Download and install Java SE Runtime Environment 5.0 or greater version.
Step 2: Visit this page to download HFSExplorer and run the installer to get it installed.
Step 3: Run HFSExplorer, click File menu, and click Load file system from path option to browse to the DMF file.
If you have come across a better solution to open DMG files in Windows, dos share with us in comments.

7-Zip

Most PC users are familiar with 7-Zip utility. If you haven’t used 7-Zip before this, it’s a free tool used to compress and uncompressed files. In addition to 7z, Zip, and RAR formats, 7-Zip also supports DMG format. However, it’s important to note that 7-Zip supports only unpacking of DMG files.
Open DMG Files In Windows using 7zip

How To Add Safe Mode To Boot Menu In Windows 8.1

Safe Mode is one of the important features of Windows operating system. The feature, which is present in all recent versions of Windows operating system, is often used to troubleshoot booting issues.
In Windows 7 and prior versions of Windows, accessing Safe Mode option was very straight-forward. We just had to press the F8 key after powering the computer. However, the procedure to boot Windows into Safe Mode is bit too complicated in Windows 8 and Windows 10.
Add safe mode to Windows 10 boot menu
Although there are a couple of ways to boot into the Safe Mode in Windows 8 and Windows 10, none of them are straight-forward and require you use additional third-party utilities.
For all those users who often need to access the Safe Mode in Windows 8 and Windows 10, here is a better way to boot Windows into Safe Mode.
The idea is to add Safe Mode option to the boot menu, which means you will see the boot menu with Safe Mode option for a couple of seconds. In fact, once configured correctly, the boot menu will appear every time you restart or perform cold boot.
You can configure Windows to display the boot menu with Safe Mode option for two or three seconds. When you need to boot into the Safe Mode, all you need to do is select the Safe Mode option in the boot selection menu and press Enter key.
If you love the idea of adding Safe Mode option to the boot selection menu of Windows 10 or 8.1, please go ahead and complete the below mentioned instructions.

Safe mode in Windows 10 or 8.1 boot menu

Step 1: Open Command Prompt as administrator. To do so, type CMD in Start menu or Start screen and then simultaneously press Ctrl+Shift+Enter keys.
Note that there are a couple of ways to run Command Prompt as administrator. You can go through our how to open Command Prompt as admin guide for detailed instructions.
Step 2: Type or paste the following command in the Command Prompt window and then hit Enter key to execute the same.
bcdedit /copy {current} /d "Safe Mode"
Add safe mode to Windows 10 boot menu step1
Once the command is executed, close the Command Prompt either by typing Exit or clicking the Close button.
Add safe mode to Windows 10 boot menu step2
Step 3: Next, open Run command box by simultaneously pressing Windows logo and R keys (Windows+R). In the box, type Msconfig and then press Enter key to open System Configuration utility dialog.
Add safe mode to Windows 10 boot menu step22
Step 4: Click on the Boot tab. Select Safe Mode from the list, check the box labelled Safe boot (under Boot options), and set the Timeout to 3 seconds. Note that you can enter a value between 0 and 30 as Timeout value. Setting 3 seconds means that boot selection menu with Safe Mode option will appear for 3 seconds before automatically booting into Windows in normal Mode.
Add safe mode to Windows 10 boot menu step3
So, if you feel that you might not be able to select the Safe Mode option in 3 seconds, you can increase the value to 5 seconds.
Finally, click Apply button. That’s it!
Add safe mode to Windows 10 boot menu step4
Reboot your PC. Safe Mode option should now appear in the boot selection menu. The boot screen menu will automatically disappear after three seconds to boot into Windows. Note that, when you select Safe Mode option from the boot menu, your PC will reboot once to boot into the Safe Mode and you won’t see additional Safe mode options.

To remove the added Safe Mode from boot menu

Step 1: Open System Configuration utility by typing Msconfig in the Run command box and then pressing Enter key.
Step 2: Switch to the Boot tab, select Safe Mode from the list (be sure to select the Safe Mode option), and then click Delete button (make sure that you selected Safe Mode and not any other option) to remove it.
Add safe mode to Windows 10 boot menu step5
Note that it’s very important to select Safe Mode option in the list before clicking the Delete button as deleting Windows 8 or Windows 10 entry will make your PC unbootable. So be very sure to select Safe Mode option before clicking the Delete button.

Troubleshooter To Get “Get Windows 10” App In System Tray

Ever since Microsoft started sending desktop notifications to Windows 7 and Windows 8.1 PCs to allow usersregister for the free Windows 10 upgrade, a number of users have been complaining about that the desktop notification or the Get Windows 10 icon is not appearing in the system tray of the taskbar despite having a genuine copy of Windows 7 or Windows 8.1.
There could be a couple of reasons why the Get Windows 10 app is not appearing on your Windows 7 or Windows 8.1. It could be because you are running a non-genuine copy of Windows. It could also be because you have completely disabled Windows Update. Or it could be because you have a Volume License copy (used in businesses).
get windows 10 app troubleshooter pic
But if you are sure you are running a legitimate, non-volume copy of Windows 7 or Windows 8.1 and haven’t turned off Windows 10 Update as well, you can now a newly released troubleshooter to fix the issue.
Yes, now that Windows 10 has been launched, Microsoft has decided to help users who can’t see the Get Windows 10 icon on despite having legitimate Windows.
The Get Windows 10 App troubleshooter will scan your Windows 7 or Windows 8.1 installation and help you get the Get Windows 10 app in the system tray.

Get Windows 10 App troubleshooter from Microsoft

Here is how use the Get Windows 10 App troubleshooter to get the Get Windows 10 App in your system tray.
Step 1: Click here to download the Get Windows 10 App troubleshooter.
Step 2: After downloading the troubleshooter, double-click on the same to launch it.
Step 3: Click Next button to let the troubleshooter scan your Windows 7 or Windows 8.1 installation and detect the issue.
get windows 10 app troubleshooter pic1
Step 4: Once the troubleshooting is completed, it will show the possible reasons why you can’t see Get Windows 10 app in the system tray.
get windows 10 app troubleshooter pic2
Alternatively, if you’re sure that you’re running a genuine copy of Windows 10 and don’t want to go through this troubleshooting, you can use the official Windows 10 Media Creation Tool to upgrade your Windows 7/8.1 installation to Windows 10 right away.

Monday, 21 September 2015

How to Unblock Blocked Websites

Some governments, schools, and businesses try to block websites in order to reduce distractions, conserve bandwidth, or censor content. If you want to circumvent such limitations--and you're willing to assume any attendant risks--you can enlist the aid of the following tools. Each one will help you mask your online identity and sidestep restrictions.

Use a Proxy Server

Proxy servers are useful tools that act as intermediaries between your computer and the websites you visit. When you can’t visit a blocked site directly, you can ask a proxy server to visit it for you. The proxy displays the blocked website, and allows you to interact with it. Since you are communicating directly with the proxy--not with the restricted site--the communication isn't blocked. Many free proxy services are available, but I suggest you start with HMA. An alternative, Anonymouse, has a similar feel. Here's how to use such a service:
1. Go the website for the proxy service, type the URL of the site you wish to unblock, and press Enter.
2. Browse the restricted site as you normally would. Notice that the address bar of your browser displays the proxy service's domain, indicating that you are browsing anonymously.
A reliable proxy service can help you circumvent Internet censorship.
Keep in mind that free proxy servers will sometimes slow down your browsing, or fail to display Web pages properly. Also, take note that although the two free proxies suggested here do not bombard you with advertisements and pop-ups, plenty of proxy services do.

Take Advantage of a Translation Service

Translation services such as Google Translate, Microsoft Translator, or Yahoo Babel Fish are similar to free proxy services in that they fetch a website and display it for you without your visiting the site directly. You can exploit this fact by asking these services to “translate” English pages into English. I find Microsoft Translator to be the best suited for this trick.
1. Visit Microsoft Translator, also branded Bing Translator.
2. Enter the URL of the restricted site into the left text field. Keep 'Translate from' as Auto-Detect and 'Translate to' as English. Click Translate.
Exploiting a Web translation service such as Microsoft Translator can help you access blocked websites.
3. The page will display below a functional and unobtrusive Microsoft Translator banner. Browse as you normally would.

Use a Virtual Private Network

Virtual private networks create a secure tunnel between your PC and a VPN server. When you connect to a VPN server, all of your communication travels through that tunnel, so third parties can't monitor it. In this setup, your online identity--your IP address--becomes anonymized, and you can access blocked websites. VPNs also offer a higher level of security than proxy servers and translation services do.
Try AnchorFree’s Hotspot Shield for a free, ad-supported introduction to accessing blocked websites via VPN. The paid version of Hotspot Shield ($45 a year, unlimited use) removes the ads, improves speed, and includes free support. Another standout in the paid-VPN category is the aforementioned HMA ($79 a year, unlimited use).

Saturday, 19 September 2015

BSNL Modem Configuration Steps to enable WiFi

Are you using BSNL Broadband Network?

Facing problems to configure BSNL Wifi Modem Router to Enable WiFi or WLAN?

hen this tutorial might rescue you and helps to configure BSNL Modem to enable Wifi/WLAN. The modem that is distributed by the BSNL are very compact and powerful. These are best for Home and Small Office Networks. But the main issue comes by connecting the Internet through Wireless Modem. To get it actually done, one must have to configure it properly with correct settings. Follow the simple steps mentioned below to get Internet on your desktop as well as Laptop without any physical connection.

  • Also check updated BSNL Broadband Plans List 2015
Firstly, connect the modem exactly as shown in the below image
bsnl broadband router connection

BSNL Modem Configuration Steps

1. First of all it is mandatory to set your IP as 192.168.1.1. To do this go to “Network Places Properties” and set you Protocol IP to 192.168.1.1 and default gateway as 192.168.1.1.
bsnl broadband router connection
2. Now open your browser and type URL http://192.168.1.1 and hit enter.
3. Now you will be prompted to enter ID and password to configure your ADSL BSNL broadband Router/Modem. Enter User Name: admin and Password: admin
4. Here Hit on “Advanced Set Up” and then “EDIT” over Service PPPoE.
5. No need to change “ATM PVC Configuration” hit “Next”.
6. Change “Connection Type” to “PPP over Ethernet (PPPoE)” then hit “Next”.
7. Enter “PPP Username and Password” and Enter Service Name as your Wish. Don’t change any other setting. Click on “Next”.
8. Don’t change any settings at “Network Address Translation Settings”. Click “Next”, then Click “SAVE”.
Enabling WiFi Security
1. Go to Wireless Tab at Left Side.
2. Then Security set Network Authentication to OPEN, Enable WEP Encryption, Current Network Key to “1” and enter Network Key 1 as ABCDE (Which acts as password while connecting to Wi-Fi).
3. Save your Settings and Reboot you Router or Modem.
If you are facing any problem while configuring BSNL Broadband Modem to enable WiFi then watch the video for better understanding.

Thursday, 11 June 2015

Process Hacker as an Alternative to Process Explorer and Task Manager


Process Hacker is an open source replacement not only for the built-in Windows Task Manager, but also for the popular Process Explorer tool. Process Hacker implements many of the same features that Process Explorer has for examining local processes, and adds a number of unique capabilities that are especially useful when examining an infected system or analyzing malware.

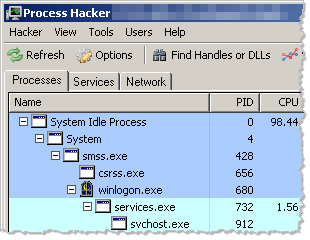
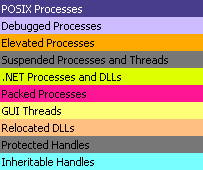
Like Process Explorer, Process Hacker can display the listing of running processes in a tree-like fashion, showing you the parent-child relationship between the processes. Both tools color-code the entries based on the processes’ characteristics:
Process Hacker can visually identify processes that are being debugged, those are associated with services and those that were packed. You can see the legend and change color assignments by selecting Hacker > Options > Highlighting:
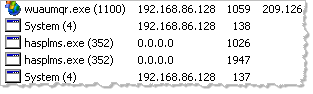
Process Hacker includes a separate tab for listing active services, and a tab showing active network connections. The tab shows local and remote IP and port details and identifies the local process that owns the connection:
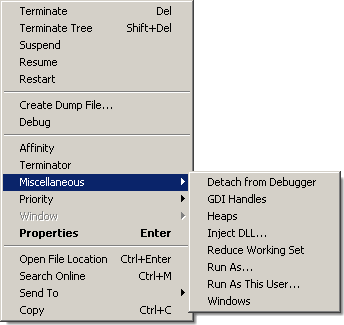
Process Hacker shines in the number of capabilities it offers for analyzing and manipulating a particular process. For instance, right-clicking the process presents you with various menu options:
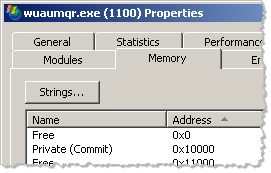
Selecting Properties gives you several tabs. One of the most useful ones is Memory, which lets you the ability to view contents of the process’ memory, extract strings, search based on regular expressions and even modify memory contents.
Other capabilities of Process Hacker include the ability to locate some hidden processes, inject a DLL into a process, create a service, locate file handles and DLLs, and many others. The best way to become familiar with the tool is to experiment with it. Give it a try, then be sure to share with others what you have learned.