Monday, 23 November 2015

Reinstall Windows Without Losing Your Data

How did things get this messed up? Windows has slowed to a crawl. Programs won't run. The free firewall you installed last year won't update or uninstall itself.

Windows 7
System Restore hasn't helped; neither have your assorted cleanup and antimalware programs. Only one option remains: Reinstall Windows and start from scratch.
I'm not going to lie to you--this is a scary and time-consuming job. Your PC may be unusable for a day or more. You could even lose all of your data.
And let's face it: You'd be wise to avoid this chore if at all possible. If someone in tech support tells you to do it, get a second opinion, and then a third.
If you have to reinstall--and sometimes it is necessary--here's how to make the process as safe and painless as possible.

Gather What You Need

You'll have to collect a few things before you can begin.
First, you'll need your recovery tool. What's that? If you're using the version of Windows that came on your PC, it's probably in a hidden partition on the computer's hard drive. That partition contains the information necessary to restore the hard drive to its factory condition.
Obviously, a hard-drive partition is not something you have to gather. But if your PC is a few years old, the recovery tool may be on one or more CDs or DVDs instead. Find the discs that came with your PC and see if anything looks promising. Alternatively, check the PC's manual to learn what kind of recovery tool came with the machine, and, if it's on a partition, how to access it.


If you upgraded Windows since you bought the PC--for instance, going from XP or Vista to Windows 7--the upgrade disc is now your recovery tool.
If you can't find a recovery disc, and the PC has no hidden partition (or offers no workable way to access that partition), contact the system manufacturer to see what they can do for you. Read "How Do I Restore Windows If I've Lost My Restore CD?" for details.
After Windows installs, you'll have to reinstall all of your programs. Collect all the original discs or downloaded installation files, and all of your license numbers.
You'll want an empty external hard drive with a capacity at least as large as your existing hard drive. Another external hard drive will come in handy later. That one doesn't have to be empty; you'll need only a part of it.
Finally, you'll need time. The best-case scenario for a reinstall is a day. The worst case: three or four days. You'll be spending a lot of that time waiting, so get a good book, too.

Back Up Everything

Things could go horribly wrong, so you need to make a backup of your entire drive. That way, you can at least return to where you were before the reinstall.
You also have to create a backup of your data, because the reinstall might destroy everything on your hard drive.
To manage both tasks, use cloning software to turn the empty external drive into an exact copy of your internal hard drive. I recommend EASEUS Todo Backup, which performs both image backups and cloning. For this job, I recommend the cloning because it will make the later job of restoring the data files easier. On the other hand, an image backup doesn't require an external drive all to itself (although it will require a large piece of one). Either option will work.
Be sure to create an emergency boot disc with EASEUS or whatever program you use to do the cloning. Without that, you may not be able to recover from a disaster.
Having a second backup of your data wouldn't hurt, especially since you're about to erase the original. If you don't already have another up-to-date backup, create one with whatever backup program you regularly use.

The Windows Reinstall

Exactly how you replace an old Windows installation with a new one depends on your recovery tool. If your PC came with a recovery partition on the hard drive, find the instructions for booting into the repair environment. Watch the screen as you turn on the computer; it might show a message such as 'Press F10 for Repair'. If it doesn't, check the manual or call technical support.
If your recovery tool is a disc, boot the PC from it.
Either way, follow the prompts.
If your recovery tool is an actual Microsoft Windows disc, the tool will ask what kind of installation to perform. You want the kind that gives you a fresh version of Windows. For Windows 7 or Vista, when the wizard asks about the type of installation, select theCustom (advanced) option. For XP, at the 'Welcome to Setup' screen, press Enter to Continue, not R for Repair.

Setting Up Windows

Congratulations: You have a fresh Windows installation. Now the hard work starts.
Remember that Windows will need updating. The patching will happen automatically, but if you want to get it out of the way, launch Windows Update and take care of it.
You'll have to reinstall at least some of your drivers. You can go back to the discs that came with your PC, printer, scanner, and so on, or you can download newer versions off the Internet. Alternatively, you can install the drivers off the clone you made before reinstalling.
If you reinstalled Windows from a vendor-supplied tool--one that returns your hard drive to its factory condition--you probably have a lot of junk on your computer. You'll have to uninstall the stuff you don't want.
The uninstallers that come with Windows applications are notoriously sloppy, leaving all sorts of remnants behind. I recommend either Revo Uninstaller or Total Uninstall. These programs run the application's own uninstaller, and then clean up the remaining mess. The difference? Revo is free, but Total does a better job with uninstalls that require a reboot. Also, Revo doesn't work with 64-bit programs, while Total does.
Now that you've cleaned Windows of unwanted applications, you have to reinstall the programs you do want. Start with your security tools, and go from there. Don't try to install two programs at the same time, and if an installation requires a reboot, don't put that reboot off. Just do it.
Once everything is installed, take some time to make Windows your own. Pick your wallpaper, change your power and screensaver settings, and so on.

Speed Up a 'Slowly Deteriorating' PC

Reader Daniel is looking for ways to speed up his aging laptop, which he says is "slowly deteriorating" but needs to last another year or two.
I get this question all the time, Daniel, and in fact I'm facing the same situation myself: my three-year-old desktop has gradually gone from speed demon to slug. Windows takes several minutes to finish its boot machinations, file searches take longer than they should, and Firefox suffers from general "slowishness."
Why does this happen? Simple: over time, Windows accumulates various OS detritus that's not unlike the plaque that builds up in your arteries. Alas, the computer equivalent of a bypass or stent won't do the trick: you need to take more drastic measures, meaning wiping the hard drive and reinstalling Windows.
I know: ugh. It's a complex, time-consuming task, one that can easily consume an afternoon--if not an entire weekend. On the other hand, it's cheaper than a new computer, and nearly as effective.
Just a few weeks ago, PC World's Lincoln Spector wrote an extensive, invaluable guide to the process: Reinstall Windows Without Losing Your Data. I'll be referring to it myself when I do my reinstall over the holiday break.
I anticipate hours of hair-pulling work. But when it's over, I know my quad-core HP with 6GB of RAM and 1TB hard drive will run like the rocket it is, not the turtle it's become.

Make Your PC Boot Faster With These BIOS Tweaks

If there's a universal truth among computer users, it's that all of them want their PC to start up faster. Nobody in the history of computing ever said, "Wow, I love this 2-minute wait between pressing the power button and actually using my machine!"
You can tweak Windows so it boots faster, of course. For instance, you can install more RAM, reduce the number of startup programs, and optimize your Registry. But let's take a look at the other piece of the puzzle: the Basic Input-Output System, or BIOS. This motherboard-hosted area of your PC controls what happens the moment you press the power button. And with a few simple changes, you may be able to cajole your system into starting a little quicker--maybe even a lot quicker.
Before we get started, let me issue a few warnings. First, monkeying with the BIOS can have unintended (and undesirable) results. If you aren't terribly tech-savvy, you might want to steer clear. Though you're unlikely to inflict any permanent harm on your system, changing the wrong setting could leave you with a PC that doesn't boot properly.
Second, before you change any individual setting, note its current state so you can restore it if necessary. Since there's no easy way to capture a screenshot of a BIOS screen, consider taking a photo with your camera or jotting down the setting on paper.
Finally, your after-tuneup mileage is impossible to predict. BIOS menus and settings differ greatly from one PC to another. Some of the options listed here might not be available on your system, and your system might have options in addition to these.

Update the BIOS

If your machine is more than a year old, chances are good that you can find an updated BIOS for it. Motherboard manufacturers often issue updates to solve problems, update features, and improve system performance.
To find out whether an update exists for your system, start with the vendor's support page--especially if you bought the PC from a company like Dell or HP. If new BIOS firmware appears on the downloads list for your system, the vendor probably has tested and approved it. Alternatively, if you know the make and the model number of your motherboard, you can check the manufacturer's Website for updates.
Whatever you do, be sure to follow the installation instructions to the letter. The process of "flashing" (that is, updating) a BIOS usually goes off without a hitch, but if you do it improperly (or if you try to install the wrong update), you could ruin your PC. Proceed with caution.
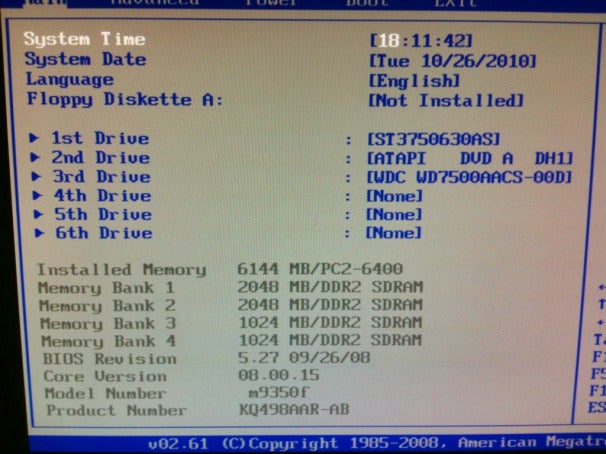
BIOS
The BIOS screen lets you quickly configure how your PC starts.

Access the BIOS

Sometimes, getting into the BIOS (usually referred to as 'Setup') can be a challenge. On most systems, a startup screen appears as soon as you power up; look for text indicating which key to press to access Setup. Usually it's F1F2F12, or Delete. You may have only a few seconds to press the appropriate key before the startup screen disappears--and sometimes you don't even get that. If there's no startup screen at all--or if it flashes by too quickly for you to read it--try rapidly pressing a few of the aforementioned keys in hopes of "catching" the right one. This should get you into the BIOS. If all else fails, consult the manual.

Put the Hard Drive First in Line

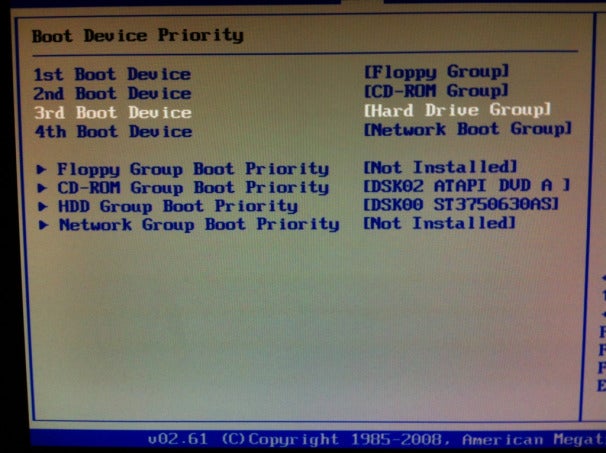
Your BIOS manages the pecking order for the system's various bootable items: the hard drive, optical drive, USB drives, and so on. At times you may want to boot from a CD or a flash drive, but most often you'll want the hard drive to go first. (That's where Windows resides, after all.) If the hard drive isn't first on the list, you'll endure delays while the system checks for the presence of other boot drives.
To modify the batting--that is, booting--order, navigate to the BIOS's Boot menu, and then look for an entry called 'Boot priority order' (or something similar). Find your hard drive in the list (it may have a cryptic name like 'IDE0' or 'WD1600BEVS-22RST0'), and then follow the listed instructions to move it to the top.
BIOS - Hard Drive Boot Order
Set your PC to check your main hard drive first, and boot times will shorten drastically.

Disable the POST

In the old days, computers had to perform a rather lengthy power-on self test (POST). Some systems still do this, though it's no longer necessary. If your PC appears to run a memory check or something similar, head to the BIOS and look for an entry labeled 'power-on self test', 'startup diagnostic', or the like. If you find such an entry, disable it.
Alternatively, look foran option called 'Fast Boot' or 'Quick Boot'; enable it, and it will likely dispense with any startup testing and go straight to booting Windows.

Disable Unnecessary Hardware

Not every user needs things like on-board 1394 (aka FireWire) ports or PS/2 mouse ports. If your motherboard has hardware that you don't use, see whether the BIOS will let you disable it. Doing so might save you only a second or two of boot time, but those seconds add up.

Save and Reboot

When you're done making any or all changes, look for the Exit menu, and then chooseExit Saving Changes (or a similar entry). This will apply your modifications and restart the PC.

Saturday, 21 November 2015

How to Disable Automatic Update Check of IDM (Internet Download Manager

Most annoying thing of Internet Download manager(IDM) is that it shows the update prompt after the interval of few days. IDM automatically check the latest available updates in background and if the latest version is available, it shows the update prompt. There is no option available in IDM to stop this update check. Sometimes it creates problems to many users or they just want to get rid of this update check. So, I created a trick to bypass this update prompt and it will not show this again. 

1. Open Run by pressing Winkey + R 

2. Type 

regedit.exe 

and then press enter 

3. Go to the key:

HKEY_CURRENT_USER\Software\DownloadManager\LastCheck 

4. Change the date to any future date of your choice in DD/MM/YY format. For example 01/01/99

5. Close regedit 

6. Restart Computer.

Now IDM(Internet Download Manager) will not check for any updates. Watch the following video for better understanding: